- Pump on / off
- Managing RPM
- Tank to Pump
- Tank Fill (Connection / Lever)
- Cooling Loop
- Cavitation / Damage
- Delivering Water
- Hydrants
- Drafting
- Water from other pumps
- Flow Meters
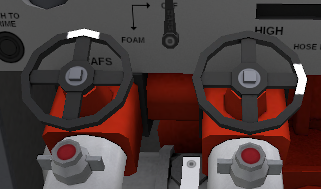
- Compressed Air Foam System (CAFS)
- Emergency Stop
Pump On/Off
The pump can be switched on and off from the cab, or from the pump panel (depending on engine status). Use the following checklist to start the pump:
Parking Brake 	- ON
Gear 		- NEUTRAL
Ignition 	- ON
PTO 		- ON
Managing Pump RPM (Speed)
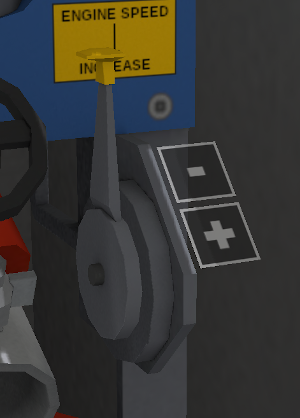 When the pump is on, + and - buttons will appear next to the RPM lever (right side of the pump panel). Click on the buttons to increase or decrease the pump speed. Warning: Excessive RPM can lead to overheating - See Cavitation / Damage
The current RPM of the pump can be seen on the RPM dial (Dark background). RPM controls several factors, including:
- LPM output
- BAR pressure
- Pump to Tank flow
- Drafting intake
Tank to Pump
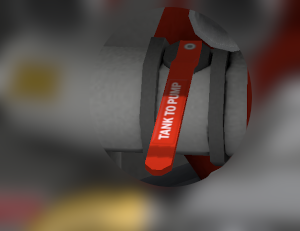 This lever controls water flow from the vehicles internal water tank. The position of the lever is an inditation of what the plate inside the pipe is doing.
- Lever left (open) = Only water from the tank can flow into the pump
- Lever down (closed) = Only water from the intakes will flow into the pump
Please note: While the Tank to Pump lever is open, a vacuum is not possible. Make sure this lever is closed before priming for drafting.
The pipe from the tank to the pump is short, and flexible, so the LPM flow will vary depending on the pump RPM.
Tank Fill (Connection / Lever)
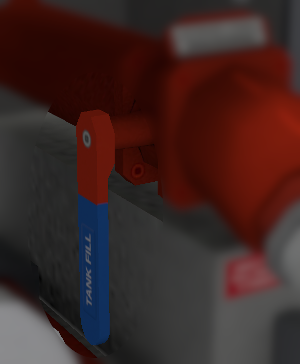 The tank fill intake is a pipe that goes directly to the internal water tank. When the lever is open (facing you), it will allow water to flow. When the lever is closed (facing down) no water will flow.
Unlike most fire pumps, opening this lever will not siphon off water from the deliveries to fill the tank. Only water entering directly into the tank fill intake will fill the tank. In order to fill the tank from a delivery, you will need to use a cooling loop.
Cooling Loop
 Also known as a cooling circle; on most pumps this is done internally with the Tank Refill lever, however, this pump is based on those used in the UK + Ireland where it's done externally.
The purpose of a cooling loop is to keep water flowing around the pump, which prevents overheating (See Cavitation / Damage). It can also be used to refill the internal water tank using a delivery.
The cooling loop uses the tank intake connection, and the far right delivery, so it is recommended that you keep these clear at most incidents. To setup the cooling loop, click on the small roll of hose in the pump bay. Make sure that the tank Fill lever is open, and the delivery valve is open, as without these water will not flow.
Cavitation / Damage
Cavitation will occur when the pump starts to overheat. If the vehicle becomes too damaged, it will break down and require repairs. There are several ways this can happen:
- Trying to deliver more water than you have available
- This is possible when using water from a hydrant, collecting breech, or any source that is not linked to pump RPM. You should be careful when using water from such a source, and monitor the flow meters closely when changing the pump RPM. Take into consideration that the flow meters are an analogue / accurate representation of the water that is flowing. This means if you are trying to deliver 900 l/pm, but only have 800 l/pm coming in, the delivery flow meter will show 800, not 900. When increasing the pump RPM, watch the delivery flow meter carefully. If you increase the RPM and the flow meter doesn't change (and it's > 0); the RPM is too high.
- Lack of water flow
- If the pumps RPM is anything above idle, then the impeller will spin. If there is no water leaving the pump (through deliveries / hose reels) then the water inside the pump will not move. This means that as the pump spins, it will start to heat up the water, and will eventually cause cavitation. If you need to keep the pump RPM above idle without contstant water flow, then you can use a cooling loop to prevent overheating. Be especially careful when using branches, or anything that doesn't have constant water flow.
 Cavitation can take around 3-6 minutes to start and can be identified by a sound that is similar to an electric kettle. There is also an optional alarm you can install.
Cavitation sound:
Delivering Water
When water is in the pump you are ready to start delivering water. The pump RPM controls the pressure and quantity of water being delivered. The pressure and quantity of water available is split evenly between any open delivery (With the exception of hose reels).
- Normal Deliveries
-
 To give water to a delivery, make sure that the hose is fully connected, then click on the valve above the connector. The white mark on the valve shows its position. If the white mark is facing up, then the valve is closed, if the white mark is facing to the right, the valve is open.
 - Hose Reels
-
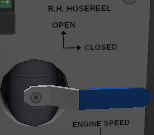 To give water to the hose reels, there is a lever for either side. These must be open (lever up) before the hosereel on that side can be used.
Some pumps will have another lever marked "Hose Reel Pressure", with the option of High and Low. If this lever is in the High position, then the hose reels will use water from the high pressure impeller, while in Low they will give the same pressure as a regular delivery. Please note that due to the diameter of the hose (22mm), hose reels are limited to 110 lpm each.
If you have both hose reels and regular deliveries in use, then you may find that the delivery flow meter is showing an abnormal value. In this case, the delivery flow meter is only showing the pressure going to the main deliveries, and you will need to add 110 for each hose reel in use for an accurate figure.
Hydrants
Please make sure that you are using the new Sombre Multi-Hydrant. Click on the hydrant cover to take it off. Once off, click inside the hydrant while holding a standpipe to place it. With the new Multi-Hydrant, there is no fixed standpipe, so the following steps may vary. To customise the hydrant, click on the outer border - This will allow you to change the colour,and litres per minute.
Testing the hydrantTo test the hydrant, click the key & bar / hydrant key; it will start to turn, opening the hydrant. Once the key stops turning, if water flows out from the connections, the hydrant is in good working order, however if no water flows the hydrant is in disrepair and will need to be repaired. Click the key again to close it.
Opening / Closing the hydrantClick on the hydrant key & bar / hydrant key to open or close the valve. The key will turn and then the flow will stop / start. If the hydrant is in working order and a hose is connected, you will be able to hear water flowing.
Drafting
Suction from open water has changed a lot from previous versions, and as such pre-2.6 draft floats are not compatible with the new pump system. Likewise, suction strainers v2.6 and above are not compatible with older pumps.
To prepare the pump for drafting, you need to create a vacuum. Use the following checklist:
All delivery valves 	- CLOSED
Pump to Tank 		- CLOSED
Supply hoses 		- ALL DISCONNECTED, EXCEPT FOR SUCTION HOSE
PRIME			- PRIME
It is important that you disconnect all supply hoses, except for suction before priming the pump, as priming the pump will cause them to collapse. Once priming is complete, slowly increase the pump RPM; you should see the chamber intake flow meter start to increase. If it doesn't there are two possible reasons for this.
- Suction strainer is too far away
- If the distance between the pump and the strainer is too large, the pump won't be able to create a proper vaccum. The distance from the pump will also affect the litres per minute available, so watch the flow meter carefully when increasing the RPM. If you try to draft more water than is currently available, the pump will cavitate.
- Priming wasnt successful
- Check that you followed the above checklist properly, if a vaccum can't be created, the pump can't start to suck water in.
Water from other pumps
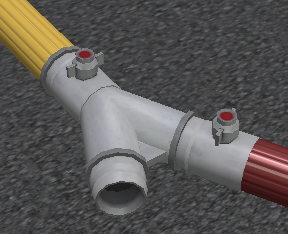 The old system using the 'Truck-2-Truck' connector has been upgraded to the Collecting Breech (shown to the right). Connect a supply hose to the single connector, and to the pump you want to receive water. Then connect regular 45mm hose to the other 2 connections, and start to deliver water.
Flow Meters
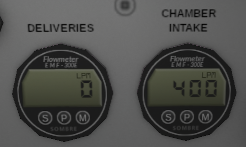 Flow meters show the amount of water passing through them. Depending on the pump, the number of these will vary. In most cases, the meter for the deliveries will show the LPM per open connection, and the chamber intake meter will show the amount of water entering the pump. Watch these carefully while operating the pump, they can show you exactly what's going on in the pump.
Compressed Air Foam System (CAFS)
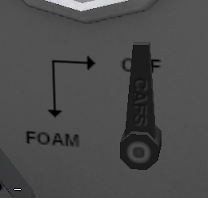 Similar to previous Sombre Pumps, only 1 delivery can have foam injected into it. You can use a dividing breech to give foam to multiple deliveries. Look for "CAFS" written above the delivery to see which one it is, then make sure that the CAFS switch is on.
To refill the foam tank, hold a foam tub in your hand, then click on the pump.
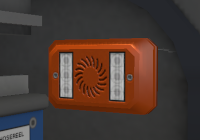
Emergency Stop
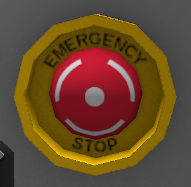 If you need to stop the pump immediately, press the emergency stop. This will use the vehicles access setting, and will stop both the pump, and the engine. May cause slight damage.